Thursday, May 29, 2014

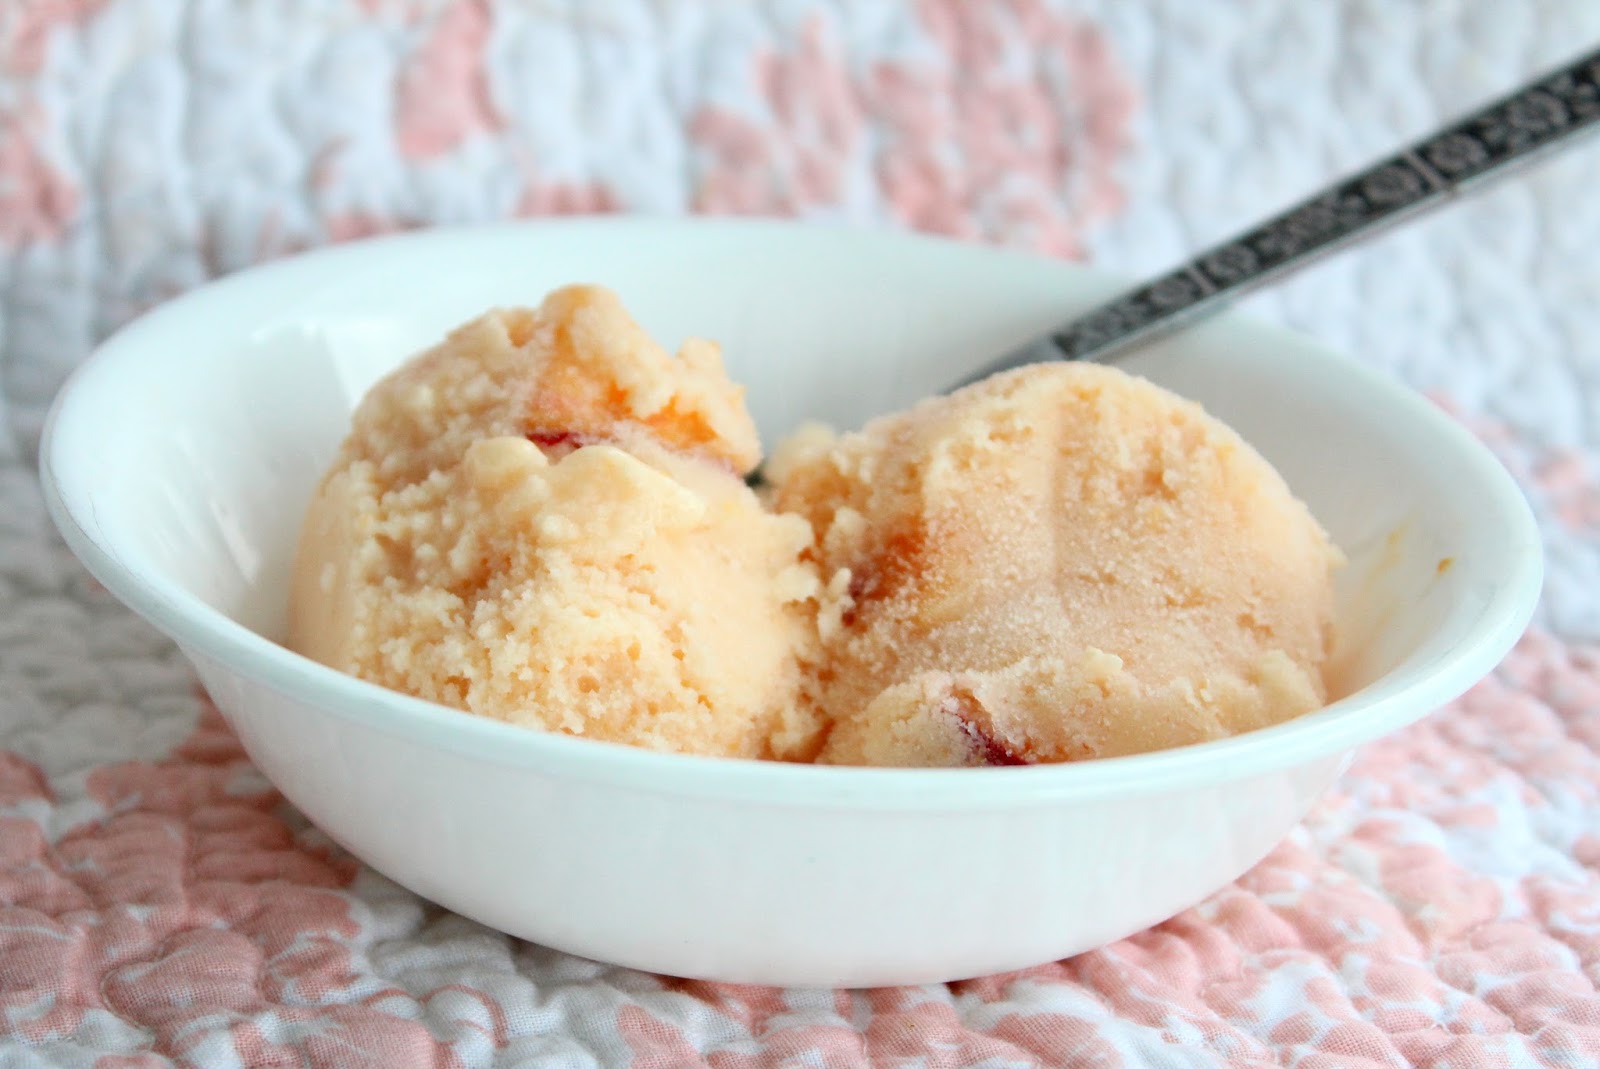
Strawberry Air


It's like a light, airy ice cream minus the cream.  Like a mousse minus the yolks.  It is a simple, fast and deliciously light dessert to cool and refresh you after a long hot day.

1 cup mashed strawberry pulp
1 egg white
1/4 c. powdered sugar, sifted

Mix egg white and strawberry pulp with whipping attachment until expanded and stiff (10-15 minutes).  Add sifted powder sugar and mix a minute more.

Put in serving cups and freeze (or chill) until ready to serve.  Top with strawberry or a dollop of preserves and whipped cream.

I have currently been trying to work my way through the freezers to make room for a (Lord willing!) plentiful garden harvest this year and I came upon several extra jars of strawberry freezer jam that I didn't know I had.  Thus, I substituted 1 cup strawberry freezer jam (thawed) for the pulp and added sugar.

I tripled the recipe to serve 8 guests so if you have more than two dessert partakers~ you'll need to double or triple it.

(A better photo will be added when I make it next.  This was a Quick! snap before serving photo while guests were waiting...which I clearly am not very good at!

Friday, February 28, 2014

Homemade Tomato Soup

 
Last year, in a desperate attempt to get caught up on preserving chores, I decide to can a bunch of whole tomatoes in addition to my typical salsas and sauces. I didn't know exactly what I would do with them but I figured this winter I'd figure out SOMETHING to do with them. 

Because let's face it- when your kitchen looks like this for the day: 


...you don't need to have anything in mind.  You just need to get to work.  And fast.

Well, winter is here and I just so happened to find a great use for them.  Homemade Tomato Soup.

I never thought that I would prefer homemade tomato soup because I grew up on Campbells and my tastebuds have grown used to the sweet, vague taste of tomato that the can of Campbells provides. 

I didn't stray too far from the Plain Jane version (you may add dill or cilantro or other herbs if you like) only because I wanted to try to recreate the storebought version.  I was pleasantly surprised that even a properly brainwashed tongue like mine would appreciate and love the taste of this homemade soup.

This soup is creamy.  It is fresh tasting.  It does not contain high fructose corn syrup.  It uses up those quarts (and quarts) of whole tomatoes.  And it is ready to eat in five minutes flat.

 SCORE!

(This soup does have seeds in it- which I thought would bother me but it doesn't at all. There is your forewarning. )

Homemade Tomato Soup
(this recipe makes enough for four bowls of soup.  Double it to feed 6-8 people.)

~ I QT jar of whole canned tomatoes
~1/3 cup tomato paste (or 1/2 of 6 oz. can)
~1 cup water
~1 t. minced onion
~ 3 t. lemon juice
~ 1 T. sugar
~ 1 1/2 c. milk

Combine all ingredients except milk in a saucepan over medium high heat until boiling.  Add milk.  Use an immersion blender to blend the tomatoes and make the soup smooth.  

Enjoy!


Homemade Ketchup


For the month of February, I gave myself a challenge: Don't buy any groceries except dairy products for the entire  month.

And then, within just a few days...I had run out of ketchup and I was cursing myself for being so dumb.  WHAT was I thinking?

Then, I realized that trying out homemade ketchup has been on my to-do for a very long time and I just had never gotten around to it.  Now seemed the perfect time since it was either go without for an entire month or get it done.

I got it done. 

And then Matt tasted it.

And now I will probably have to 'get it done' for the rest of my days.

This is a winning recipe...tastes delicious.  Lacks the high fructose corn syrup. Whips up in about five minutes or less.  Uses simple ingredients that you likely already have in your cupboard. 
Makes about 1 1/2 pints.

I give you~

Homemade Ketchup

Ingredients:

  • 12 oz can tomato paste
  • 1/2 cup honey (you can also just use sugar)
  • 1 cup white vinegar
  • 1/2 cup water
  • 2 tsp sugar
  • 1 1/2 tsp salt
  • 1/2 tsp onion powder
  • 1/4 tsp garlic powder

Directions:

Combine all the ingredients in a medium saucepan over medium heat; whisk until smooth.

Thursday, February 27, 2014

Homemade Toothpaste


Because you asked:  my recipe for HOMEMADE TOOTHPASTE

There are a ton of recipes out there, with a ton of variations, but this is mine.  I don't actually follow it anymore (because then I would have to find the paper it is written on!) but rather add things until it tastes 'right' and you should do the same.  Taste the sweetness and +/- xylitol or stevia.  Taste the peppermint oil and +/- the concentration.  Start with my base and make it to your liking!

1/2 c baking soda
1 t. salt 
1-3 T. of xylitol or a few drops of liquid stevia (many people don't use this, but I think it tastes a WHOLE lot better!  And homemade shouldn't equal torture in my book.)
15-20 drops of peppermint oil.  (Minty fresh breath is an essential for me.  If my toothpaste ain't minty, it just aint' toothpaste.  I like my toothpaste VERY minty so I hover around the larger number.  When I first began making toothpaste, I didn't know where to find peppermint oil so I tried peppermint extract instead.  I used a LOT more of it and it worked ok.  Then I found true peppermint essential oil and tried that out and it rocked my world.  SO MUCH BETTERDo yourself a favor and just invest in some essential oil.

3-4 T. Vegetable Glycerin (use as much as needed to make a thick paste!)


Stir it up and use it up!

All ingredients can be found at your local healthfood store or grocery.

* I may try to replace the vegetable glycerin with coconut oil in the future... coconut oil is good for you and your teeth and I happen to have a bunch of it (so I won't have to buy more glycerin)...but in the meantime, I love this recipe just the way it is.


Thursday, January 2, 2014

Chocolate Gingerbread Cookies


This recipe makes BEAUTIFUL cookies, especially when understated with a simple white frosting.  These cookies are elegant looking and tasting- they aren't gaudy and sweet but more subtle and deep flavored. They are on the drier side and so, are best suited to eat with a nice hot cup of cocoa, coffee or tea.


You'll need:

5 T unsalted butter, softened 
1/3 c.solid vegetable shortening 
1/2 c. (packed) dark brown sugar 
1 egg
1/2 c. molasses 
2 ounces bittersweet chocolate, melted and cooled
 3 1/4 c. all-purpose flour, plus more for dusting 
1/3 c. unsweetened cocoa powder 
1 T ground ginger 
2 t. ground cinnamon 
1 t. ground cloves 
1 T baking soda 
1/2 t. baking powder 
1 t. salt

What you do:

1) Cream brown sugar, shortening and butter.  Add egg, mix well. Add chocolate, mix well.

2) Mix together dry ingredients in a separate bowl if you want.  Or in the "wet" ingredients if you are lazy.  (I won't tell.)  I usually DO use a separate bowl for this sort of thing since I want the spices to be uniform throughout.  You can mix the dry ingredients into the wet in two different steps to keep flour from flying.
 
3)  Form dough into a ball, over with plastic wrap and refrigerate for an hour or so.

4) When thoroughly chilled, roll out dough to baout 1/4 inch- cut with cookie cutters and bake in a 350 degree oven for 5-7 minutes, until the tops look dryish.  

5) Let cookies cool on baking sheets for a few minutes before transferring to cooling racks.  

6) Decorate as you see fit.  I used my buttercream frosting made a bit stiffer with more confectionary sugar (because I don't care much for the flavor of royal icing). 
 

Farmhouse Cut-Out Sugar Cookies

 
These cookies are delicious.  
They are sweet, but not too sweet; soft, but still crispy on the outside.   Best of all, this recipe yields about 5 dozen cookies, give or take (depending upon the size of your cookie cutters), which means there will be plenty to snitch and plenty to serve.  

The addition of sour cream lends a delicious depth of flavor- but also makes for a bit of a moister dough so you may need to add a bit more flour to the dough if it becomes to sticky.  But not too much!  Too much flour, too dry a dough is never a good thing when it comes to cut-out cookies.

You'll need:

1 cup shortening
2 c. sugar
2 eggs
1 c. sour cream
1 t. vanilla
4 1/2 c. flour
4 t. baking powder
1/2 t. salt
1/2 t. baking soda

What you do:

* Mix first five ingredients until thoroughly creamed.

* Add rest of dry ingredients.  (You could mix them together in a separate bowl and then add them...but I never do.  Why dirty another dish?  Am I right, or am I right?)

* Chill for about an hour.

* Roll out to about 1/4 inch thick, using a sprinkling of flour on the table and rolling pin and cut with your favorite cutters.  OR roll in a log shape, refrigerate for 2 hours and then slice.

* Bake cookies on greased cookie sheets in a 350 degree oven until edges are just the slightest bit golden brown.  Cool for a minute or two on sheets before moving to cooling racks.

* Slather, smear, and bejewel the cookies with goodness.  I use buttercream frosting, but you can do as you like. 

Buttercream Frosting


Until I get a better photo to post, this downright messy picture of buttercream frosting IN ACTION will have to do.  But, the fact is....this is buttercream frosting in all its' glory.  On the fingers and lips of children.  Making the world a colorful place.  A happy place.  A delicious place.

* Beat 1/3 c. butter until fluffy.

* Add 2 c. powdered sugar- but until fluffy.

* Slowly add 1/4 c. milk and 1 1/2 t. vanilla.

* Beat an additional 2 1/2 c. powdered sugar.

(At this point add more milk or sugar to reach desired consistency. if necessary.)

* Color as you see fit.

PS.  To make enough icing for my Farmhouse Cut-Out Cookies, I double this recipe.

PPS.  If you add a bit more confectionary sugar to the icing for stiffness, it makes a lovely substitute for royal icing.  One that actually has flavor!  (In my opinion.)

PPPS.  If the icing is to be piped, I sift the powdered sugar when adding it to the bowl.

Sunday, September 1, 2013

Mint Chocolate Ribbon Ice Cream


This was BY FAR the BEST ice cream from the self-inflicted Summer Sundae challenge.  Mint chocolate is one of my favorites though- so it is no wonder.

Many of the homemade ice creams I have made have needed a custard base- which can be tricky to do and results in a thicker homemade taste, not to mention is a lot more time-consuming to do.  This one,  however, requires no such thing and because it is made with half milk, half cream it is lighter and fluffier than other homemade ice creams.  I swear this stuff tastes like it is from Mr. Perry himself.

So, so, so good.


Mint Chocolate Ribbon Ice Cream *****

Ingredients:

2 cups heavy cream
2 cups milk (I used 2%- but you can use whatever.)
1 cup sugar
1/4 t. salt
1 t. vanilla
2 t. peppermint extract
3-4 drops food coloring (optional.  White mint ice cream is just as tasty I'm sure.)

1 cup chocolate chips
2 t. oil, shortening or butter (I used coconut oil)

Directions:

Mix first 7 ingredients together with a mixer for a minute until thoroughly combined.  Add to an ice cream maker and churn until soft serve. (follow directions on your ice cream maker)

While it is churning, put the dark chocolate chips and coconut oil in a microwavable bowl and microwave in increments of 30 seconds until melted and smooth.  (Or you can make it super easy on yourself and use mini chocolate chips, or mint oreo crumbles or brownie bites...I won't tell.)

Put a layer of  ice cream in a freezable container , followed by a dollop of melted chocolate- spread around thinly.  Continue the ice cream and chocolate layers for the rest of the ice cream and chocolate. Freeze ice cream until hard.

Sunday, August 18, 2013

Peanut Butter Ice Cream with Dark Chocolate Ripple and Chocolate Covered Peanuts

Since there were no eggs to temper and custard to make, this ice cream was SUPER FAST to make. Really, just a push of a few buttons here and a plop or two there.


 This was a BIG hit with the children.  They couldn't stop raving.  Matt said it was like eating cold fudge.  (They all give it five stars...)  I, on the other hand, didn't care for it too much.  I'd give it three stars, max.  I couldn't help but think there was a very oily undertone.  I guess that is to be expected, it being made with peanut butter and all.  If you like, make it and decide for yourself!

Peanut Butter Ice Cream with Dark Chocolate Ripple 
(and garnished with Chocolate Covered Peanuts) *****
yield: 1 quart


You'll need:
3/4 c. peanut butter
a heaping 3/4 c. sugar
2 2/3 cup heavy whipping cream (or half and half if you want to be less naughty)
pinch o' salt
a splash of vanilla

1/2 cup dark chocolate morsels
1 teaspoon coconut oil
1/4 cup peanuts

In a food processor or blender, puree' the peanut butter, sugar, cream, salt, and vanilla until smooth.

Chill thoroughly in fridge- then freeze in ice cream maker according to manufacturer's instructions.

While it is churning, put the dark chocolate chips and coconut oil in a microwavable bowl and microwave in increments of 30 seconds until melted and smooth.

Put a layer of peanut butter ice cream in a freezable container , followed by a dollop of melted chocolate- spread around thinly.  Continue the peanut butter and chocolate layers until you have about 1/4 cup of melted chocolate left.  Freeze ice cream until hard.

Add peanuts to the bowl of remaining chocolate, coat.  Spread on wax paper until cooled.  Serve atop or on the side.  Or just eat them.  That works too.

Sunday, August 11, 2013

Vanilla Bean Ice Cream

I thought it was high time I made a more traditional ice cream.   Matt's favorite ice cream outside of cookie dough is vanilla bean, so I thought this was a good place to start.  Besides, I still had some blueberry pie to finish and it was just begging to be a la mode.


Vanilla Bean (Custard) Ice Cream *****
yield: 1 1/2 quarts

You'll need:

1 cup milk
3/4 cup sugar
2 cups heavy cream (divided)
pinch of salt
1 vanilla bean, split in half lengthwise
6 large egg yolks
3/4 teaspoon vanilla extract

Here's How:

Warm milk, sugar, 1 cup of the cream and salt in a saucepan over medium.  Scrap the seeds from the vanilla bean into the mixture and then add the beans too.  You just want to heat the mixture up- not boil it or anything.  After it has heated, remove from heat, cover and let sit and steep for 30 minutes.

After 30 minutes, heat again until warmish hot.

Wisk the egg yolks (this is done easily in a stand mixer, if you have one.)  With the motor still running, slowly splash little splashes of milk/sugar mixture into the eggs-(This tempers them so they don't scramble!).  Do this, little by little until the whole thing is in the eggs.  Once tempered, pour back into the saucepan and put over medium heat again.  Cook over medium heat, constantly stirring, until mixture thickens and coats spatula.

Put the remaining 1 cup of cream in a bowl with a strainer on top- pour the custard into the cream, straining any bits of egg that might have formed.  Stir the strained custard into the cream (still keeping the bean in it) and add the vanilla extract.  Put in a waterbath to cool it and put it in the fridge to chill thoroughly. (A few hours- or even overnight. I put plastic wrap on the top to keep a film from forming on top.)

Church using your ice cream makers' directions.  Eat soft serve or toss quickly back into freezer for several hours for hard ice cream.


*Remember!*  Hard ice cream should be brought out of the freezer for five minutes or so before serving- homemade ice cream is much harder than storebought!  For an example of this- photo one is straight from the freezer, photo two was kept out for a few minutes before serving.

Sunday, August 4, 2013

Nectarine and Honey Frozen Yogurt

This past week I wanted to try something a bit more healthy than full blown ice-cream so I opted to experiment with frozen yogurt.

I happened to have four nectarines a bit too bruised to be appetizing for a raw fruit snack (and it is a rare thing indeed for me to even BUY them, so I couldn't waste the last few, spots or no spots.)

Thus, Nectarine Honey Frozen Yogurt was born.  

The idea was to be a bit healthier than last weeks' ice cream because it is YOGURT for goodness' sake!  Never you mind about the maple syrup and honey...it has YOGURT in it!


Nectarines and Honey Frozen Yogurt  *****

I used:

 1 quart of my homemade vanilla yogurt.  (I make my yogurt using this recipe. Note, with this recipe, my yogurt is already somewhat flavored with maple syrup and vanilla.)  You could use storebought too, of course.
4 nectarines, divided
1/2 c. honey (this was VERY honey flavored and sweet.  You could get away with less, especially when starting with a sweetened yogurt.)
1 splash lemon juice

How I did it:

1) Peel 3 of your nectarines, cut them into hunks and add to a food processor or blender with honey and splash lemon juice.  Process until smooth.

2) Add puree' to yogurt and freeze in your ice cream maker, following their instructions, until frozen to soft set.

3) Cut fourth nectarine into chunks and add to frozen yogurt during soft set stage.

4) Pour into freezer-safe container and freeze until hard, a few hours.

*  I have discovered that you ought to take homemade ice creams, yogurts and sorbets out of the freezer about 5-10 minutes before serving so that it becomes softer.   Straight from the freezer, it is rock hard and flaky and much less appetizing than storebought frozen treats.  This is because commercial machines can 'whip' the desserts with more power and more speed, thus adding more 'air' and softness- not to mention additives included to do so.  If left out of the freezer for 10 minutes before serving, your homemade treats will be a wonderful consistency.  Promise. *


Sunday, July 28, 2013

Blueberry Cheesecake Icecream

A self-inflicted challenge to come up with a new frozen dessert once a week from now until the end of summer (although it could extend into fall thanks to caramel apple ice cream, and pumpkin pie ice cream and gingersnap swirl ice cream...) in an effort to... 

1) rid ourselves of high fructose corn syrup poison (slightly dramatic there...for effect) 
2) feed our insatiable appetite for frozen sweets ('tis true.)
3) sap some creativity into my sometimes same-old, same-old kitchen 
and 
4) to blow the dust off of my long-since abandoned recipe blog 

has resulted in... 

ICE CREAM "SUNDAYS" 

 Last week was our very first go-round and I decided, after having spent three mornings of that week picking huckleberries, that I would make Blueberry Cheesecake Ice Cream.


Our rating: *****
(The recipe made for a delicious ice cream but the method could have been improved to make the over-all taste better.  The original recipe, found here, called for adding the blueberries raw (mashed a bit) before the second hard freeze.  This sounded great but ended up resulting in little blueberry hockey-pucks in every bite which I just didn't really fancy.)

  This is my modified version, which will hopefully take care of the frozen balls dilemma.  It involves cooking the blueberries until they are soft and making a sort of sauce to mix in the ice cream, rather than adding (and freezing) solid berries.  I'll update when I try it again- probably next huckleberry season! 

In the meantime, if you try it my way- let me know how you like it!

INGREDIENTS

  • 2 cups whole milk
  • 3 cups heavy cream
  • 1 1/2 cups granulated sugar (divided)
  • 4 egg yolks
  • 8 oz. cream cheese
  • a splash of lemon juice
  • 6 cups blueberries, fresh or frozen (thawed).  I use huckleberries because we pick them and they are free. 
  • 1 T cornstarch plus 1 T. water

HOW-TO

  1. Combine the blueberries, 1/2 cup sugar and lemon juice in a saucepan on medium heat and bring to a boil. Simmer for 8-10 minutes until blueberries are very soft and almost mushy. Roughly mash or break up the blueberries.. Drizzle the cornstarch/water solution over the blueberries and stir until it comes to a boil and thickens. Turn off the heat and transfer the compote into a heatproof bowl. Let it cool and refrigerate until needed. 
  2. Whisk the egg yolks with 1 cup sugar. In a saucepan set on medium heat, bring the milk and the cream to boiling point, slowly pour a small amount on the egg yolks to temper. Pour the remaining over the yolks and sugar.
  3. Stir well then pour back in the saucepan and cook over medium low heat until the cream thickens and coats the back of a wooden spoon.
  4. Remove from the heat and whisk in the cream cheese until completely melted and incorporated. Cool to room temperature then cover and refrigerate until cold.
  5. Process in an ice cream maker until it has reached soft-serve stage and almost doubled in size.
  6. In a freezer-safe container, place 1/3rd of the churned ice-cream, followed by 1/3rd of the blueberry sauce. Repeat this layering process until finished. Freeze the ice-cream for at least 4 hours before serving.

Monday, September 17, 2012

Fudgy (not cake-y) Zucchini Brownies


 It took a few tries, but I finally found an AWESOME zucchini brownie recipe!  This is a winner, through and through.  Moist and fudgy- not cakey like most- and deliciously chocolate, this is hands down the best recipe I tried.  So, SO good.

Here is what you'll need:


  • 1/2 cup vegetable oil
  • 1 1/2 cups white sugar
  • 2 teaspoons vanilla extract
  • 2 cups all-purpose flour
  • 1/2 cup unsweetened cocoa powder
  • 1 1/2 teaspoons baking soda
  • 1 teaspoon salt
  • 2 cups shredded zucchini
  • 1/2 cup chopped walnuts
  •  
  • 6 tablespoons unsweetened cocoa powder
  • 1/4 cup margarine
  • 2 cups confectioners' sugar
  • 1/4 cup milk
  • 1/2 teaspoon vanilla extract

  • And here is how you do it: 
    Preheat oven to 350 degrees F Grease and flour a 9x13 inch baking pan.  
    In a large bowl, mix together the oil, sugar and 2 teaspoons vanilla until well blended. 
    Combine the flour, 1/2 cup cocoa, baking soda and salt; stir into the sugar mixture. 
    Fold in the zucchini and walnuts. Spread evenly into the prepared pan.  
     Bake for 25 to 30 minutes in the preheated oven, until brownies spring back when gently touched. 
    To make the frosting, melt together the 6 tablespoons of cocoa and margarine; set aside to cool. In a medium bowl, blend together the confectioners' sugar, milk and 1/2 teaspoon vanilla. Stir in the cocoa mixture. Spread over cooled brownies before cutting into squares. 

    ~~~~  Thank you Allrecipes ~~~~

    Flourless Zucchini Breakfast Bread


    I was looking for a zucchini brownie recipe and found this flourless one.  Having Gluten Free friends, I thought I would kill two birds with one stone and make delicious zucchini brownies and have a new gluten-free recipe under my belt for when the occasion arises.

    But it turns out, these weren't what I deemed a BROWNIE to be- but more of a zucchini bread taste in square form.  Still delicious, still worthy of repeating, still amazing since they have no FLOUR (!!!) but not worthy of the title "BROWNIE". 

    Plan on making these for breakfast and not dessert and you won't be disappointed!

    What you will need:
    • 1 cup of peanut butter. (The original recipe called for almond-but I didn't have any.  If you do, use it!)
    • 1 1/2 cup of shredded zucchini.
    • 1/3 cup of raw honey
    • 1 egg
    • 1 tsp of vanilla
    • 1 tsp of baking soda
    • 1 tsp of cinnamon
    • 1/2 tsp of nutmeg
    • 1 cup of dark chocolate chips. I used gluten free chocolate chips.
    Directions:
    1. Preheat oven to 350 degrees.
    2. Combine all the ingredients into a large bowl and mix everything together.
    3. Pour into a greased 9x9 baking pan.
    4. Bake for 35-45 minutes, or until a toothpick comes out clean.
    ~~~ The original recipe was found here. ~~~~~

    Baked Zucchini Fries


    These baked zucchini fries are not only healthy, but delicious!  They turn out perfectly seasoned and very crispy, without the worry of (to work or waistline) frying.  Really, a summer MUST from henceforth in the Newman House.


    You need:

    2 lb zucchini
    1/2 c. flour
    1/4 t. salt
    2 c. bread crumbs (panko.  OR, homemade whole wheat-like I used.)
    1/2 c. parmesan cheese
    2 T. Italian Seasoning
    2 eggs
    a bit of water

     Here's how:

    Preheat oven to 425 degrees.  Rinse and dry the zucchini. Cut the ends off and then cut each one into strips.

    Put the flour and salt in a ziploc bag and shake the zucchini strips in it to coat.   In a wide, shallow bowl combine the bread crumbs, parmesan cheese, and Italian seasoning. Stir to combine. In a second wide, shallow bowl, whisk a raw egg with about 1 T. of water until fairly smooth.

     Cover a baking sheet with foil and then place two wire cooling racks over top. One by one, take the flour coated zucchini strips and dip them in the egg and then the seasoned bread crumb mixture. Place the breaded zucchini on the wire cooling racks making sure that they do not touch each other (for good circulation.)  The wire racks keep the zucchini up off of the baking sheet and allows hot air to circulate underneath, which will prevent soggy bottoms.

    Bake for about 15 minutes or until they are a medium golden brown color.

     Serve them right away- they are best when they are warm!

    ~~~~~~~~~~ I originally found this recipe here- a cool site that breaks recipes down by cost to see just how much you are spending (or, better still, SAVING!) by making your own. ~~~~~~~~~~

    Tuesday, August 21, 2012

    Hearty Minestrone


    Soups are hard to write recipes for becaus, as I have said before, my goal is usually to use up what I have on hand rather than follow recipes to a tee.  So if you have sweet potatoes instead of carrots or green beans instead of zucchini-- then by all means, use THEM!  Don't ever be boxed in to recipes, ESPECIALLY soups.  That said- here is this particular days' variation.

    1 pound mild Italian Sausage
    2 med. onions, diced
    2 med. green peppers, diced
    1 T. minced garlic
    2 carrots, diced
    2 stalks celery, cut into pieces

    (Brown the meat with the tiniest bit of oil.  Add everything else and saute until the onions are translucent.

    Then add:

    14 oz. water
    1 can kidney beans, drained
    1 can garbanzo beans, drained
    1 can stewed (or crushed) tomatoes
    4 T. sugar
    1 jar spaghetti sauce  (I used a homecanned quart jar so I don't know if that is more or less than storebought, but they look about the same.)
    1 T. italian seasoning
    1 t. salt
    A few turns of the peppermill
    1 bay leaf

    This you let simmer for a while and then, 20-30 minutes before serving add

    2 cups of water
    1 cup of pasta

    When the pasta is cooked through, discard the bay leaf and serve!

    PS.  Before adding the last water and pasta, if you have a smaller family you can divide this large portion of soup into smaller portions to freeze for later. Then simply thaw and some pasta and water and ta-da-  DINNER FAST!

    PPS.  Soups always taste SO much better if given time to meld.  So if you can manage to make the soup in the morning and put it in the fridge, that is how soups love to be treated.  Even still, it is a great soup. 


    Lemony Blueberry Zucchini Muffins


    I really love zucchini muffins. You know the ones I mean~ the brown and heavily spiced kind sometimes dotted with walnuts. The banana muffins' brother. But sometimes, you just want something....different.

    Well, THESE zucchini muffins certainly are that.  They are barely distant cousins to the zucchini muffins we know and love.  The zucchini makes them moist but it is the lemon and blueberries that really stand out for flavor.  They have only subtle sweetness, so if you prefer a very sweet muffin- use a bit more sugar.

    These will be great for winter muffins, using frozen shredded zucchini from the summer and the frozen berries I put up in July.  Plus-they are just so sunny looking.

    Here is what you do:
    • 1 3/4 cups all-purpose flour
    • 3/4 cup ( to one cup, depending on preference) white sugar
    • 1 t. baking powder
    • 3/4 t. baking soda
    • 1/2 t. salt
    • 1 cup shredded zucchini
    • 1 (8 ounce) container yogurt (I used plain because that is what I had on hand.  Lemon would be awesome.)
    • 6 T butter, melted
    • 1 egg, beaten
    •  2 T. lemon juice 
    • 1 cup fresh (or frozen) blueberries   
    •  
    •  
    •  
    • Here is what you do:
    •  
    • Preheat oven to 400 degrees. Grease 12 muffin cups, or line with paper muffin liners. 
    • Mix flour, sugar, baking powder, baking soda, and salt in a large bowl; make a well in the center of the flour mixture. Mix zucchini, yogurt, butter, egg, 1 tablespoon lemon juice, and 1 tablespoon lemon zest in a separate bowl; pour yogurt mixture into well. Gently stir yogurt, slowly incorporating the flour mixture until just blended. Batter may be slightly lumpy. Add berries.  Pour batter evenly into prepared muffin cups.(I usually plop one or two berries on top of each cup of batter to make for prettier muffins too.  You don't have to-but can.)
    • Bake in preheated oven until a toothpick inserted into the center of a cupcake comes out clean, about 20 minutes.


    Tuesday, August 14, 2012

    Summer Squash Boats


    The problem with my cooking is this:  I believe in the waste not, want not theory.  So I throw a little bit of this in, throw a little bit of that into recipes in order to clean my fridge.  This is how I make sure we use things up without being wasteful and also how I have taught myself to cook (learning what works and what emphatically DOESN'T!).

    This method is great for our palates, not-so-great for writing recipes.

    So here is the how-to for making zucchini boats, with the superfluous stuff in italics.

    You'll need:

    • 2-3 zucchini or summer squash
    • 1 pound meat of some sort (I used a jar of homecanned ground beef in tomato sauce but sausage would be good!  Or chicken!  Or beef cubes!  Kielbasa works great too!)
    •  1 large onion, diced
    •  1 large green pepper, diced
    • 1-2 cloves garlic, depending upon your tastes (I used two)
    • any other veggies you might like or have to use up:  I used some leftover roasted delicata squash, zucchini and potatoes from the other night and two carrots that we pulled up for Sketch Tuesday that I promised we would eat for supper (our first pulled up garden carrots create quite the excitement around here!) 
    • spaghetti sauce, about a 1 cup. (Mine was canned with the beef and I also added five fresh small tomatoes.
    • Cheese of some sort, shredded (any would be good.  I used mozzerella because that is what I had.)
    • Seasonings:  a few pinches each of salt, pepper and italian seasoning
    Here's what you do:

    Cut in half 2-3 zucchini lengthwise and hollow out seeds with a spoon or scoop, leaving the bottom intact.  Place on a cookie sheet or baking pan and preheat oven to 400 degrees.

    Meanwhile, brown meat (and discard some fat if necessary) (OR use canned beef, like me!) then saute onion, green pepper, carrots, garlic in mixture until onions and peppers are nearly ready.  (This is when I added my roasted leftover veggies) Add sauce and a few fresh tomato hunks (if you want) and simmer for a few minutes some of the water is cooked off.

    Fill up your squash boats with your beef mixture and top with mozzerella and put in the oven for about 20-25 minutes until the meat mixture is nicely browned and the zucchini is cooked.

    Monday, July 30, 2012

    Beet Greens


    I really love beets.  I love the taste of them, I love the look of them, I *love* growing them, I love thinning them!  So it is all the more unfortunate that I only learned about beet greens a few years ago; to think of all the delicious greens I just....discarded. (gasp!)

    Next time you pull up some beets from your garden-don't throw those leaves away!  Utilize those flavonoids and vitamins for your own benefit: Try this recipe instead...and be forever converted.

    **For an extra treat, I will occasionally add crumbled bacon pieces to the top before serving...but only when I want to impress.

    You'll need:

    • 1 pound beet greens
    • 1/4 cup chopped onion
    • 1 large garlic clove, minced
    • 3/4 cup of water
    • 1 Tbsp granulated sugar
    • 1/4 teaspoon crushed red pepper flakes
    • 1/6 cup of cider vinegar
    •  1 or 2 strips of  bacon, chopped** (or a tablespoon of bacon fat)

    ** If you choose to impress with bacon, brown it now. Pat it dry and set aside.

    Keep the hot grease or heat 1 Tbsp of bacon fat in your large skillet.

    Add chopped onions, cook over medium heat 5 to 7 minutes, stirring occasionally, until onions soften and start to brown. Stir in minced garlic. Add water to the hot pan, stirring to loosen any particles from bottom of pan. Stir in sugar and red pepper. Bring mixture to a boil.

    Cut the leaves and stems an inch or two from the neck of the beet. Wash and pat dry your beet greens, and if you want to chop them, do so-I usually don't) and then add them to the skillet by gently tossing them in the onion mixture so the greens are well coated. Reduce heat to low, cover and simmer for 5-15 minutes until the greens are tender. Stir in vinegar.

    ** Top greens with bacon pieces just before serving.


    Thursday, July 26, 2012

    Saucy Spareribs


    Spare ribs are a very special treat in this house but since we had our home-grown hogs butchered, we happen to have them in the freezer.  So on a middle-of-the-week, hotter than heck summer day, and nobody present except our very own selves, we decided to have a feast.  

    These spare ribs were delicious.  The sauce was divine.  Try them next time you want a middle-of-the-week feast.  That's all.

    6 lb. pork spare ribs
    1 t. salt
    water
    3 T cooking oil
    1/3 c. finely chopped onion
    1 clove garlic, minced
    3/4 c. ketchup
    1/3 c. light corn syrup
    1/3 c. vinegar
    2 T. worcestershire sauce
    2 T. soy sauce
    2 T. spicy mustard

    Place ribs and salt in a kettle with enough water to cover.  Bring to a boil and then reduce heat to low and simmer for 45 minutes or until almost tender.

    Drain well.  Set aside (in fridge if it won't be for a while)


    Meanwhile, heat oil in 2 qt. saucepan over medium heat and sauce onion and garlic in it about five minutes or until tender.  Add remaining ingredients, mixing well.  Cook until mixture comes to a boil and then reduce heat and let simmer for 15 minutes. 

    To Grill:

    Grill ribs over medium heat, turning and basting often with sauce, for about 30 minutes or until ribs are well glazed.